As part of my homelab migration, I have a number of Ubuntu Server VMs to migrate out of VMware ESXi v8.0 into a Proxmox cluster running v9.1.
The following steps cover the migration process I have taken. These steps are likely to work against newer and older builds. Other Guest operating systems will vary.
Make sure you shutdown the VM in ESXi before importing, and of course, hold backups.
EXSi Storage Endpoint
First key step is to add the ESXi source as storage into the Proxmox Datacenter.
Navigate to Datacenter > Storage > Then Add storage. This will produce a menu that will give you a series of Sources, at the bottom ESXi will be available. Select this.
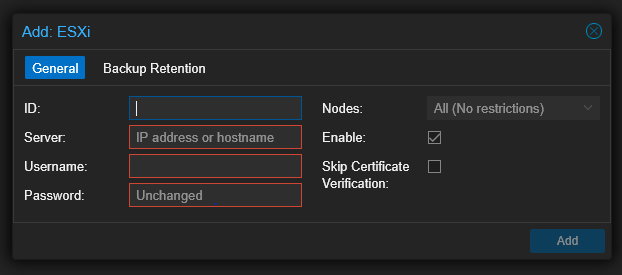
ID: identifier such as esxi
Server: IP Address or Hostname of the ESXi source
Username: Username of an account on ESXi that has required permissions – root will work, but not recommended.
Password: Password…
Nodes: Leave on all, this adds the storage to all nodes in a cluster. You can limit this to a single node if you have a specific machine for all imports.
Enable: Leave checked
Skip Certificate Verification: Checked
Backup retention is not required as this is not supported.
Import
Next step is navigate to the Node within the Proxmox cluster for which you want to import to. You should now see the esxi storage within the node.
Select the Virtual Guest you wish to import and press Import
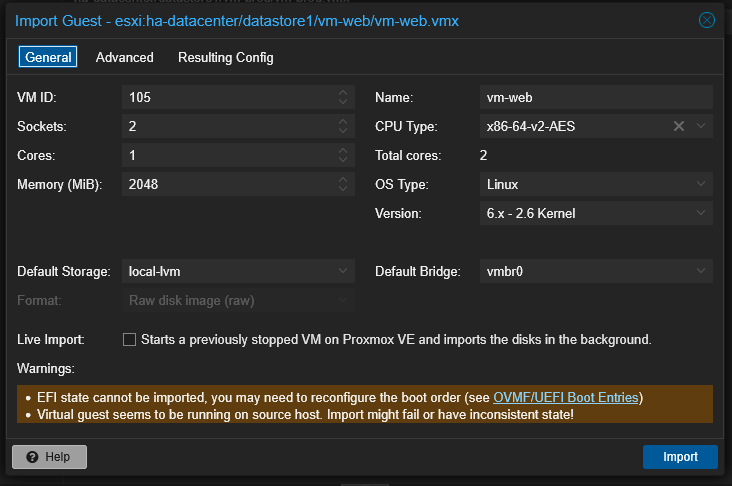
You can adjust the VM before import, such as CPU and Memory. These can also be adjusted at a later date through the standard processes, so for the purposes of migrating over, I leave everything as default and press Import.
Starting VM
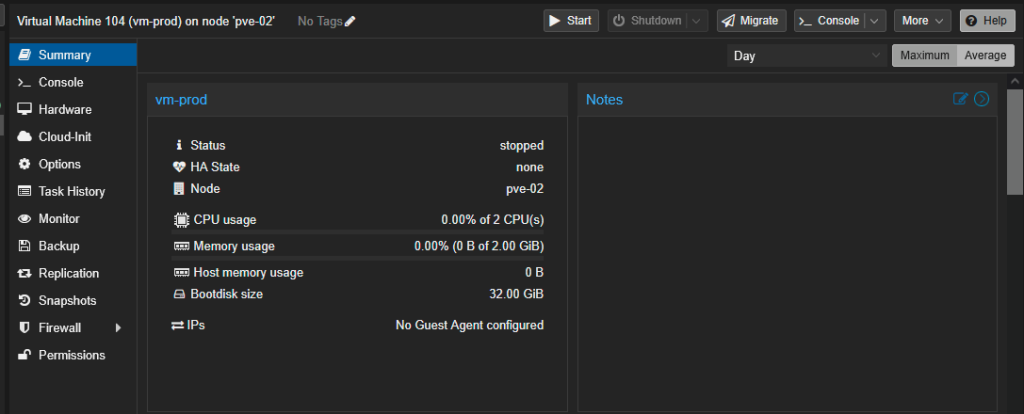
Once the VM has been imported, you can go ahead and startup the VM.
Use the console view to validate that the machine has been brought up correctly, and you are ready to make any minor adjustments that are required.
Network Device
It is typical that the network config within the VM will need to be adjusted as the host interface has changed.
Through the console on the running VM, login.
use ‘ip a‘ or ‘ip link show‘ to identify the device names, and status.
You can check for errors using ‘journalctl -u systemd-networkd‘
At this point it’s likely the main network device has a status of DOWN as the operating system is still configured to the old device from ESXi. This can be adjusted easily through the command line.
Navigate to the Netplan configuration folder ‘cd /etc/netplan‘
Use ‘ls -la‘ to list all config files in the folder

For myself, the config file is 00-installer-config.yaml, we need to edit this one using ‘sudo nano‘ – noting the file is owned by root. Entering the root password when required.
Using nano, update the ‘ethernets’ to the new device such as below. Static IP can also be configured at this point, but I prefer to assign via DHCP.
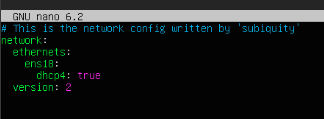
Once the file has been written out, run ‘sudo netplan apply‘ to apply the new configuration.
For best practice also reboot the VM – ‘sudo reboot‘
Once the VM has come back up – you can re-run the ‘ip a‘ command and verify the network device is now UP. As below.

From here your new VM will be migrated.